
Prologue
I recently wrote a tutorial explaining how to make a connected barometer in which I used Thingspeak as an endpoint for the data. With the current buzz around the Internet of Things, a lot of similar services popped up : Plotly, the Wolframe data drop, Xively and even IBM Cloud to name a few.
What I find problematic with theses services is that you loose control over your data. What are they used for, what happens if the company closes ? You don’t want to lose your preciously collected data.
One solution is to create your own data platform. This way you keep full control over your database. You can set-up backups and are sure that your digital property wont be used for commercial purposes behind your back.
We will thus be making IoT.me, a web application using Node.js as a server, Express.js for the framework and MongoDB as the database (the MEAN stack, without the A).
IoT.me : application requirements
Let’s take a minute to think about our needs. First, we want to be able to authenticate the user. IoT.me is built as a single-user application, but the backend is ready to support multiple users. We need a way to create new collections of data which we will call Datasets, and to customize the fields (variables) of this collection. Each dataset will be issued a read and write API key that can be publicly distributed to authenticate requests sending data in or requesting data out. We also need a way to easily regenerate theses keys if they end up being compromised.
How does that translate in term of views ? Well first we need a setup screen so that the user can register. Once logged in, he will need some kind of dashboard giving a quick overview of his datasets. He needs to be able to create new datasets, to edit (as well as delete) and view them. Finally we will also provide a simple ‘settings’ page if he ever wanted to change its username or password.
Table of content
This tutorial will be organized in the following way : first we will take care of installing all the per-requisite. We will then make our way through the MVC (Model View Controller) pattern in a slightly different order, starting with the models defining the structure of our data, then the controllers (called routes in Express.js) and finally the corresponding views. At each step will be associated a specific commit holding our progress thus far.
Initial set-up
Note : this tutorial assumes that your are running a linux architecture. I’m personally working on ubuntu 15.04.
Server dependencies
The following modules will be needed to run our application. Start by installing them if it’s not already the case :
- Node.js: the server of our application. If you’re more used to that, it’s like apache but running on javascript. It comes in with npm, an awesome package manager that will make our life much easier.
- MongoDB: a very versatile database system. I like it because of its object-like structure and the fact that ‘tables'(collections) can be created on the fly even if they were not previously registered.
- Express-generator: an npm package used to generate an express.js skeleton with a simple command. Express.js is a lightweight framework for Node.js. At the difference of ‘traditional’ frameworks such as Laravel on PHP or Django on Python it doesn’t come with a clearly defined structure which can be a bit confusing at first (especially when you’re reading different tutorials that each use their own way of doing things). The counterpart is that it offers a great deal of flexibility to the developer about the way he wants to structure its application.
- Nodemon: a utility that will monitor for any changes in your source and automatically restart your server. We will use it instead of node to run our application, this way we won’t need to restart the server after each modification (pretty handy he!).
# Install node.js
curl --silent --location https://deb.nodesource.com/setup_0.12 | sudo bash -
sudo apt-get install --yes nodejs

# Install latest stable MongoDB
sudo apt-key adv --keyserver hkp://keyserver.ubuntu.com:80 --recv 7F0CEB10
echo "deb http://repo.mongodb.org/apt/ubuntu trusty/mongodb-org/3.0 multiverse" | sudo tee /etc/apt/sources.list.d/mongodb-org-3.0.list
sudo apt-get update
sudo apt-get install -y mongodb-org

# Install Express-generator
# the -g option is used so that the package is installed globally,
# meaning that we can now use it from the command line
# Try express -h to see the options now available
sudo npm install express-generator -g

# Install Nodemon
sudo npm install nodemon -g
Express.js skeleton
Navigate to the directory of your choice and generate the skeleton of our application. After that, install the default dependencies. Finally, a quick test will ensure that everything is running properly.
# Generate skeleton
express IoT.me

# Install dependencies
cd IoT.me
sudo npm install

# Run the app
nodemon bin/www
The app is being served on port 3000. To check if everything is going well, fire up your browser at the following address : http://localhost:3000. You should receive a warm welcome from Express.
Corresponding code
Application dependencies
We’re now ready to add the packages required for our application :
- Mongoose : our ODM (Object Data Manager).
- Connect-mongo : used to store the user’s session information in the database.
- Express-session : a standard session manager for Express.js.
- Method-override : this package will be used in order to pass PUT and DELETE requests though POST requests.
- Bcrypt : for password hashing.
- Hat : to generate unique API keys.
All these packages will be installed with the –save argument so that they are automatically added to the package.json file.
sudo npm install mongoose connect-mongo express-session method-override bcrypt hat --save
Setting up the app
We need to make a few changes to the app.js file. First let’s import the packages we just installed :
var express = require("express");
...
    bodyParser = require("body-parser"),
    methodOverride = require("method-override"),
    mongoose = require("mongoose"),
    session = require("express-session"),
    MongoStore = require("connect-mongo")(session);
Then add a connection to the database (which we name ‘iotdb’):
// Connect to mongodb
mongoose.connect("mongodb://localhost/iotdb", function(err) {
    if (err) throw err;
    console.log("Successfully connected to mongodb");
});
We need to add two middlewares, the first being express-session. As I previously said, it is used to store the user’s session info, which is pretty handy if you want to keep him logged in between views (and to ensure that a user has been authenticated before accessing protected resources). We will also use it in order to pass messages between the views. Connect-mongo is used to store the session’s informations in the database.
// We use mongodb to store session info
// expiration of the session is set to 7 days (ttl option)
app.use(session({
    store: new MongoStore({mongooseConnection: mongoose.connection,
                          ttl: 7*24*60*60}),
    saveUninitialized: true,
    resave: true,
    secret: "MyBigBigSecret"
}));
Finally we will configure method-override to look for a hidden field called ‘_method’ in our POST requests. This way we will be able to post PUT and DELETE requests as well.
 // used to manipulate post requests and recongize PUT and DELETE operations
app.use(methodOverride(function(req, res){
      if (req.body && typeof req.body === "object" && "_method" in req.body) {
        // look in urlencoded POST bodies and delete it
        var method = req.body._method
        delete req.body._method
        return method
      }
}));
That’s it ! We’re ready to define our first models.
Corresponding code
The models
Create a new folder in your application directory called models. We need to create two models : one to store the user’s informations and the other for the datasets.
Users
Create a new file called users.js in the models folder. This model is very simple : we want to store a username and a password, as well as the timestamp of creation.
var mongoose = require("mongoose");

// Declare schema
var userSchema = new mongoose.Schema({
    name: {type: String, required: true, index: {unique: true}},
    password: {type: String, required: true},
    created_on: {type: Date, default: Date.now}
});

// Export schema
mongoose.model("User", userSchema);
But this is not all. We also need to ensure that the password is stored as a hash so that it never falls into the wrong hands if your database is ever compromised. This will be done by adding a middleware relying on bcrypt to hash the password value before adding the user to the database. Don’t forget to import bcrypt and to set the salt factor.
...
    bcrypt = require("bcrypt"),
    SALT_WORK_FACTOR = 10; // used to resist rainbow table and brute force attacks
...
// Add hashing middleware to schema
userSchema.pre("save", function(next) {
    var user = this;

    // only hash password if it has been modified (or is new)
    if (!user.isModified("password")) return next();

    // generate a salt
    bcrypt.genSalt(SALT_WORK_FACTOR, function(err, salt) {
        if (err) return next(err);

        // hash the password using the new salt
        bcrypt.hash(user.password, salt, function(err, hash) {
            if (err) return next (err);

            // override the cleartext password with the hashed one
            user.password = hash;
            next();
        });
    });
});
...
Finally, we need to add a method to the schema that will enable us to compare passwords based on their hash. This is done so that we can authenticate users later on.
...
// Add compare method to schema
userSchema.methods.comparePassword = function(candidatePassword, next) {
    bcrypt.compare(candidatePassword, this.password, function(err, isMatch) {
        if (err) return cb(err);
        next(null, isMatch);
    });
}
...
Datasets
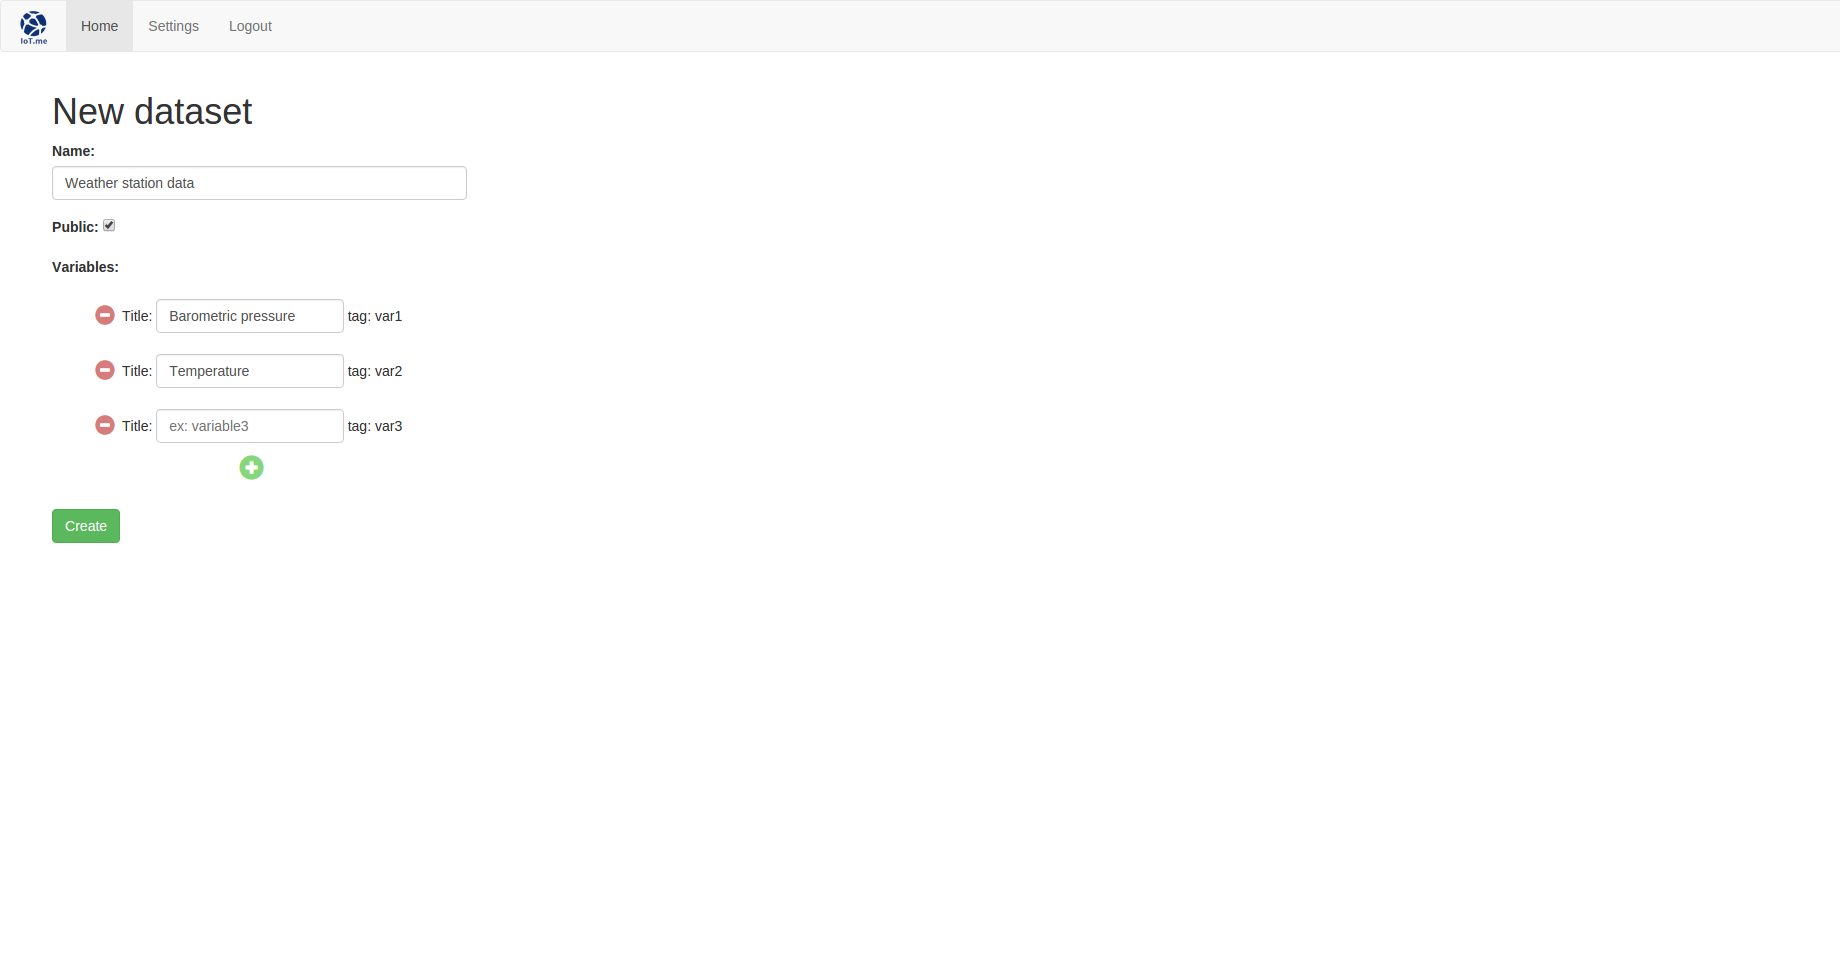
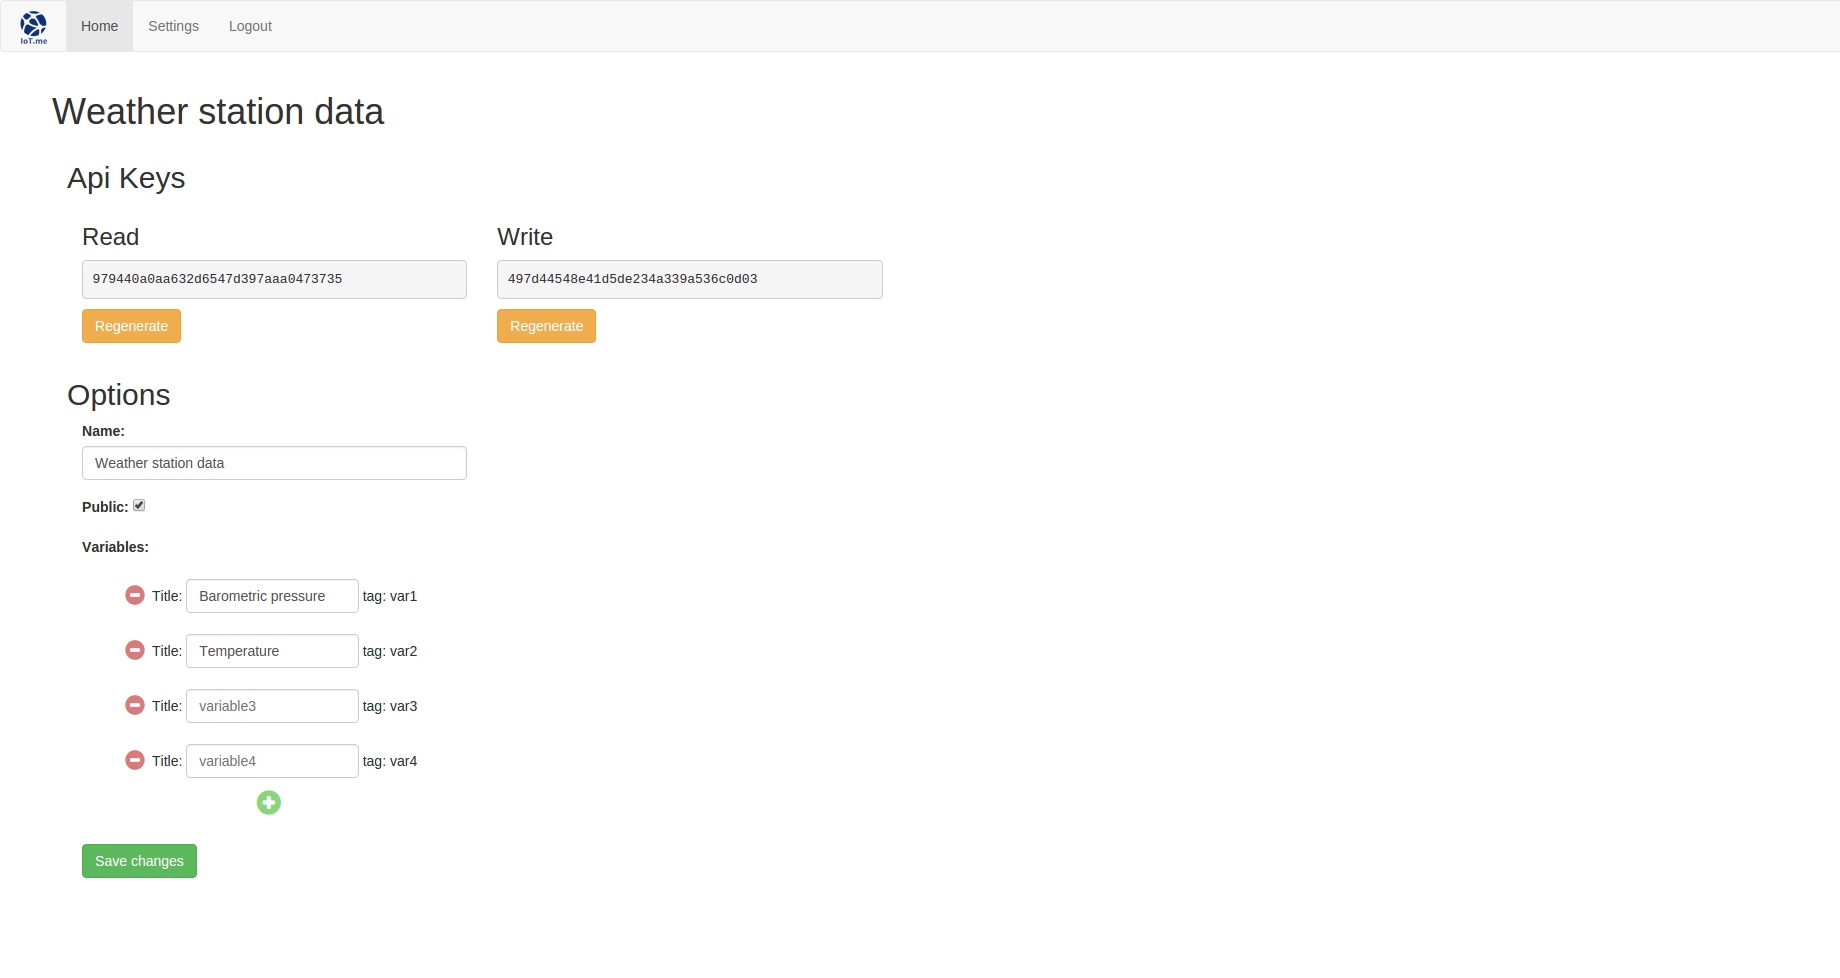
The dataset model will be a bit more evolved than the last one. It will hold the read and write API keys, the name of the dataset, a unique index used to identify the dataset (we wont use the _id of the dataset because we don’t want to end up with a url looking like /datasets/de1eee192869b90f993acf3857691f07 so we’ll generate a shorter one), the username of the owner of the dataset, a public option which will authorize non authenticated users to access the dataset view, two fields holding the timestamp of creation and last data entry, the number of data entries and finally the data.
Create a new file called datasets.js filled with the following code :
var mongoose = require("mongoose");

// Declare schema
var datasetSchema = new mongoose.Schema({
    index: {type: String, required: true, index: {unique: true}},
    name: {type: String, required: true},
    owner_name: {type: String, required: true},
    read_key: {type: String},
    write_key: {type: String},
    public: {type: Boolean, default: false},
    data: {type: Object},
    entries_number: {type: Number, default: 0},
    created_at: {type: Date, default: Date.now},
    last_entry_at: {type: Date}
});

// Export schema
mongoose.model("Dataset", datasetSchema);
Don’t forget to import the models in app.js :
...
// Loading DB models
var user = require("./models/users"),
    dataset = require("./models/datasets");
...
Corresponding code
The routes
Now that we know which data to store, it’s time to see how we will handle it. This is where things get trickier (well, only a little). We will need 3 categories of controllers :
- One for the user handling, which will be limited to a CRUD (Create Read Update Delete) API that will allow us to act on our users schema. This is what I meant when I said that our application will be ready to serve multiple users even if this version is not made for it : you will be able to rely on this API.
- One to deal with the datasets. It will control the
new,editandshowviews, as well as provide yet another CRUD API allowing to act on the datasets model. This is where we will handle the requests pushing new data points to the dataset and asking for the existing data. - Last but not least a more general controller will handle the remaining views and requests :
setup,login, dashboard (index),settingsandlogout.
An authentication middleware
But before jumping into the routes we need to make a small detour. We don’t want anyone to be able to use the APIs we are going to make. Only an authenticated user should be able to modify his account, right ? Same thing with generating or modifying API keys, as well as accessing the dashboard or the dataset if it is made private.
In order to do that, we will create a middleware that will be called before each route for which authentication is needed. Create a new file called utils.js in the root directory. This is where we are going to put our middleware which will simply ensure that the current user in session has been authenticated. Since we pass the user’s information to the session manager after each login request, this is what we will be looking for. If the user is indeed authenticated, we pass the request to the route. Otherwise we redirect to the login page with and error message. Pretty straightforward.
// Middleware used to check if user is authenticated before accessing a resource
function authenticate(req, res, next) {
    if (req.session.user) {
        next();
    } else {
        req.session.error = "You need to be authenticated to access this resource.";
        res.redirect("/");
    }
}

exports.authenticate = authenticate;
Users CRUD API
You’ll notice that the routes folder is already included in our skeleton. Isn’t that convenient. We will progress step by step from now on. Start by importing the User schema and the authentication middleware we juste made.
var express = require("express"),
    router = express.Router(),
    mongoose = require("mongoose"),
    User = mongoose.model("User"),
    helper = require("../utils");
Then we’ll create the first method of the API : POST used to create a new user. We first check that the user is authenticated before letting him perform the operation. The controller simply takes the username and password provided, calls the create method on the user schema and responds according to the result. Remember the hashing middleware we wrote earlier ? It will be called automatically so that the password will be stored as a hash. The newly created user is returned as a json.
// Create - POST
router.post("/", helper.authenticate, function(req, res, next) {
    // Get values from POST request
    var name = req.body.name;
    var password = req.body.password;

    // Create new user document
    User.create({
        name: name,
        password: password
    }, function(err, user) {
        if (err) {
            console.log("Error creating new user: " + err);
            res.send("Error creating new user.");
        } else {
            console.log("POST creating new user: " + user);
            res.json(user);
        }
    })
});
The GET request is even simpler : it looks for a user matching the id provided in the url and returns it as a json.
// Retreive by ID - GET
router.get("/:id", helper.authenticate, function(req, res){
    // Find user document by id
    User.findById(req.params.id, function(err, user){
        if (err) {
            console.log("Error retrieving user " + err);
            res.send("Error retrieving user.");
        } else {
            console.log("GET user with ID: " + user._id);
            res.json(user);
        }
    });
});
The PUT request is used to update a user’s information. We ask the user to confirm its new password in case of change so that he doesn’t lock himself out of the app by mistake. So we check if both password fields match, create an update request according to which new information was provided and update the user document. You’ll notice that we use the save method instead of update. This is so that the hashing middleware is called, which wouldn’t be the case with update. If an error occurred, we redirect to the settings page with an error message, else we redirect to the index with a success message an update the current session with the new user’s info.
// Update by ID - PUT
router.put("/:id/edit", helper.authenticate, function(req, res) {
    // Get form values
    var newUsername = req.body.username;
    var newPassword = req.body.newPassword;
    var newPasswordBis = req.body.newPasswordConfirm;

    var passError = null;

    // Check if password and confirmation match
    if(newPassword||newPasswordBis) {
        if (newPassword!=newPasswordBis) {
            newPassword = null;
            passError = true;
            req.session.error = "The passwords do not match, try again.";
            res.redirect("/settings");
        }
    }

    if (!passError) {
        //find user document by ID
        User.findById(req.params.id, function(err, user) {
            if (err) {
                console.log("Error retrieving user " + err);
                req.session.error = "A problem occured retrieving the user.";
                res.redirect("/settings");
            } else {
                 // Check what to update
                if (user.name!=newUsername) user.name = newUsername;
                if (newPassword) user.password = newPassword;

                // Save is used instead of update so that the hashing middleware is called on the password
                user.save(user, function(err, userID) {
                    if (err) {
                        console.log("Error updating user: " + err);
                        req.session.error = "A problem occured updating the user.";
                        res.redirect("/settings");
                    } else {
                        console.log("UPDATE user with id: " + userID);
                        // Regenerate session with new user info
                        req.session.regenerate(function() {
                            req.session.user = user;
                            req.session.success = "Update successful";
                            res.redirect("/index");
                        });

                    }
                });
            }

        });
    }
});
As for the DELETE request, it fetches the user matching the id provided in the url and deletes it as you would expect it to. An error/success message is passed to the session according to the result.
// Delete by ID - DELETE
router.delete("/:id", helper.authenticate, function(req, res) {
    // Find user document by id
    User.findById(req.params.id, function(err, user){
        if (err) {
            console.log("Error retrieving user " + err);
            req.session.error = "A problem occured retrieving the user.";
            res.redirect("/settings");
        } else {
            // Remove user document
            user.remove(function(err, user){
                if (err) {
                    console.log("Error deleting the user " + err);
                    req.session.error = "A problem occured deleting the user.";
                    res.redirect("/settings");
                } else {
                    console.log("DELETE user with ID: " + user._id);
                    req.session.regenerate(function() {
                        req.session.success = "Account successfully deleted";
                        res.redirect("/setup");
                    })
                }
            });
        }
    });
});
Corresponding code
Datasets
This one was not included by default, so create a new datasets.js file in the routes folder and prepare it with the required imports.
var express = require("express"),
    router = express.Router(),
    hat = require("hat"),
    mongoose = require("mongoose"),
    Dataset = mongoose.model("Dataset"),
    helper = require("../utils");

// Content goes here

module.exports = router;
CRUD API
We’ll set the GET request aside as it involves dealing with the read API key.
Let’s start with the POST. We retrieve the user’s name from the current session informations. Then we extract the dataset name and the public option values from the body of the POST and delete these keys from the object. Why ? Because we then need to iterate through the remaining keys to retrieve the information concerning the variables to include in our dataset. The dataset is then created and the user is redirected to the index which is served with an appropriate message to display.
// POST new dataset request
router.post("/", helper.authenticate, function(req, res) {
    // Used to set the dataset owner
    var sessionUser = req.session.user.name;
    // Get values from the post request
    var name = req.body.name;
    var isPublic = req.body.public != undefined ? true:false;
    // Delete the values from the request body so that we only keep information about the variables
    delete req.body.name;
    delete req.body.public;

    // This is so that we can loop through the object in reverse order
    // We do that so that the fields are saved in the right order on the db
    // (this way it will appear in the right order on the 'edit' view)
    var propertiesList = [];
    for (var property in req.body) {
        if (req.body.hasOwnProperty(property)) {
            propertiesList.push(property);
        }
    }
    propertiesList.reverse();

    var variablesFields = {};
    for (var i in propertiesList) {
        console.log(propertiesList[i])
        variablesFields[propertiesList[i]] = {name:req.body[propertiesList[i]],
                                    values: Array};
    }

    // Create dataset
    Dataset.create({
        index: helper.uniqueIndex(),
        name: name,
        owner_name: sessionUser,
        read_key: hat(),
        write_key: hat(),
        public: isPublic,
        data: variablesFields
    }, function(err, dataset) {
        if (err) {
            console.log("Error creating the dataset: " + err);
            req.session.error = "A problem occured when creating the dataset. Please try again.";
        } else {
            console.log("New dataset created with id: " + dataset._id);
            req.session.success = "Dataset " + name + " created successfully.";
        }
        res.redirect("/index");
    });
});
Hat is used to generate unique read and write keys and a unique index of 9 characters is generated by…what’s that ? A new helper function we didn’t create yet ?! Let’s repair that! Go back to the utils.js file and add the following function :
...
// Helper used to generate unique index of 9 characters based on the current timestamp + a little randomness
function uniqueIndex() {
    var now = new Date();
    var index = Math.floor(Math.random() * 10) + parseInt(now.getTime()).toString(36).toUpperCase();
    return index;
}

exports.uniqueIndex = uniqueIndex;
...
The PUT request follows a similar logic than the POST, except that we have to be a bit smart about how we handle the variables : if a variable is found on the request but not on the existing dataset, we add it to a list of variables to be set. Otherwise if it is absent for the request but present in the dataset, it means that it has to be removed so it is added to a list of variables to be unset. Once again, we then redirect to the index page with the appropriate message.
// PUT request to update dataset
router.put("/:id/", helper.authenticate, function(req, res) {
    // Get values from the POST request
    var name = req.body.name;
    var isPublic = req.body.public != undefined ? true:false;
    // Delete the values from the request body so that we only keep information about the variables
    delete req.body.name
    delete req.body.public

    var setList = {};
    var unsetList = {};
    var updateQuery = {};

    // Find dataset by id
    Dataset.findById(req.params.id, function(err, dataset) {
        updateQuery = {
            name: name,
            public: isPublic
        }
        // If variable in request body and not in dataset, add to setList (or if no variable at all in dataset)
        for (var property in req.body) {
            if (!dataset.data||(req.body.hasOwnProperty(property)&!dataset.data.hasOwnProperty(property))) {
                console.log(property)
                console.log(req.body[property])
                setList["data."+ property] = {name:req.body[property],
                                                values: Array};
            }
        }

        // If variable in dataset but not in request body, add to unsetList
        for (var property in dataset.data) {
            if (dataset.data&&dataset.data.hasOwnProperty(property)&!req.body.hasOwnProperty(property))
            {
                unsetList["data."+property] = true;
            }
        }

        // If setList or unsetList non-empty, add to updateQuery
        if (Object.keys(setList).length) {
            updateQuery["$set"] = setList;
        }
        if (Object.keys(unsetList).length) {
            updateQuery["$unset"] = unsetList;
        }

        // Update dataset
        dataset.update(updateQuery, function(err, datasetID) {
            if (err) {
                console.log("Error updating dataset: " + err);
                req.session.error = "Update failed, please try again.";
            } else {
                console.log("Update on dataset: " + datasetID);
                req.session.success = "Update successul.";
            }
            res.redirect("/index");
        });
    });
});
The DELETE request shouldn’t be a mistery by now :
// DELETE dataset request
router.delete("/:id/", helper.authenticate, function(req, res) {
    // Find dataset by id
    Dataset.findById(req.params.id, function(err, dataset) {
        if (err) {
            console.log("Error retrieving the dataset: " + err);
            req.session.error = "A problem occured retrieving the dataset.";
            req.location("index");
            res.redirect("/index");
        } else {
            // Remove dataset document
            dataset.remove(function(err, dataset) {
                if (err) {
                    console.log("Error deleting dataset: " + err);
                    req.session.error("A problem occured deleting the dataset. Please try again.");
                } else {
                    console.log("Deleted dataset with id: " + dataset._id);
                    req.session.success = "Successfully deleted dataset " + dataset.name;
                }
                res.redirect("/index");
            })
        }
    });
});
API keys
We will now take care of 3 special cases we didn’t handle yet : how to push data and get data providing the appropriate API keys.
Updating an API key wont be difficult. A POST request is made to a specific route, providing the _id of the dataset that needs to be updated and the name of the key (read or write). We store the redirect url as we can’t hardcode it this time : it depends on the index of the dataset being updated.
// POST request to update API key
router.post("/update/key", helper.authenticate, function(req, res) {
    var redirectUrl = req.headers.referer; // used to redirect to dataset edit page
    // Get values from the POST request
    var id = req.body.id;
    var key = req.body.key;

    var updateJson = {};
    updateJson[key+"_key"] = hat(); // Generate new API key

    // Find dataset by ID
    Dataset.findById(id, function(err, dataset) {
        if (err) {
            console.log("Error retrieving dataset: " + err);
            req.session.error = "A problem occured finding the dataset";
            res.redirect(redirectUrl);
        } else {
            // Update dataset with new key
            dataset.update(updateJson, function(err, datasetID) {
                console.log("API key updated: " + key);
                res.redirect(redirectUrl);
            });
        }
    });
});
The request to add new entries to the dataset will look like that: /datasets/update?key=WRITE_APIKEY&var1=value&var2=value etc. Each variable must have been registered beforehand for the value to be stored. They are selected by they tag which is normalized, contrarly to their name which are personalized by the user. We retrieve the write API key from the GET request arguments and delete the key from the query object so that we can then iterate through the variables and their values. The dataset is fetched according to the key provided. Before inserting the values, we check that the variables have beem previously registered. The values are added by the $push operator in the data document. An appropriate response code is then sent depending on the result.
Here what the structure of data looks like :
“data”:{
“var1”:{“name”:”Variable A”,”values”:[[1,1442867230518]]},
“var2”:{“name”:”Variable B”,”values”:[[2,1442867230518]]}
}}
As you can see it is composed of nested documents each representing a variable. Each variable document is indentified by its tag. It holds its name (if defined) and an array of values. Each value is a composed of the value per-se and a timestamp of the time of insertion.
// GET request to push data to the dataset
router.get("/update", function(req, res) {
    // Get values from request arguments
    var apiKey = req.query.key;
    delete req.query.key; // flush api key value so we only keep values concerning variables

    var values = [];
    var updateQuery = {};

    // Find dataset by write API key
    // Send status code for each case : -1 if error, 0 if no dataset found and 1 if update successful
    Dataset.findOne({write_key:apiKey}, function(err, dataset) {
        if (err) {
            console.log("Error retrieving dataset: " + err);
            res.sendStatus(-1);
        } else if (dataset.data) {
            // build $push query with variables passed in POST request
            // we check that the variable have already been registered otherwise they"ll be ignored
            for (var property in req.query) {
                if (req.query.hasOwnProperty(property)&dataset.data.hasOwnProperty(property)) {
                  updateQuery["data." + property + ".values"] = [parseInt(req.query[property]), Date.now()];
                }
            }
            // Update dataset with new values and increment entries_number
            dataset.update({$push: updateQuery,
                            $inc: {entries_number: 1},
                            last_entry_at: Date.now()}, function(err, datasetID) {
                if (err) {
                    console.log("Error updating dataset: " + err);
                    res.sendStatus(-1);
                } else {
                    console.log("New entry for dataset with API key: " + apiKey);
                    res.sendStatus(1);
                }
            });
        } else {
            console.log("Either no dataset was found for this API key: " + apiKey + " or the dataset doesn't have any variables set");
            res.sendStatus(0);
        }
    });
});
To request a dataset, one need to provide the correct read API key. A new object representing the dataset stripped from sensible information is created and returned as a json. Here is what you can expect as a response :
{
“owner_name”:”Rocky”,
“name”:”My dataset”,
“index”:”3IEUDLFEZ”,
“public”:true,
“created_at”:”2015-09-21T20:18:46.478Z”,
“last_entry_at”:”2015-09-21T20:27:10.518Z”,
“entries_number”:1,
“data”:{
“var1”:{“name”:”Variable A”,”values”:[[1,1442867230518]]},
“var2”:{“name”:”Variable B”,”values”:[[2,1442867230518]]}
}
}
// GET request to get data
router.get("/request", function(req, res) {
    // Get values from request arguments
    var apiKey = req.query.key;

    // Find dataset by read API key
    Dataset.findOne({read_key: apiKey}, function(err, dataset) {
        if (err) {
            console.log("Error retrieving dataset: " + err);
            res.sendStatus(-1);
        } else if (dataset) {
            // Strip dataset from sensible informations (_id and API keys)
            var cleanDataset = {owner_name: dataset.owner_name,
                                name: dataset.name,
                                index: dataset.index,
                                public: dataset.public,
                                created_at: dataset.created_at,
                                last_entry_at: dataset.last_entry_at,
                                entries_number: dataset.entries_number,
                                data: dataset.data
                                }
            // return dataset as json
            res.json(cleanDataset);
        } else {
            console.log("No dataset found for this API key: " + apiKey);
            res.sendStatus(0);
        }
    });
});
These two routes must be placed before the others for them to work properly.
Views controllers
Now for the easy part. Here we simply control which information is sent to our views.
We don’t need anything to create a new dataset, only to render the proper view :
// GET new dataset page
router.get("/new", helper.authenticate, function(req, res) {
    res.render("datasets/new");
});
To edit a dataset, we simply need to retrieve it according to its index and pass these informations to the view :
// GET edit dataset page
router.get("/:index/edit", helper.authenticate, function(req, res) {
    var index = req.params.index;

    // Find dataset by index
    Dataset.findOne({index: index}, function(err, dataset) {
        res.render("datasets/edit", {"dataset": dataset});
    });
});
The show view is a bit tricky. We retrieve the dataset according to its index and serve it with a stripped version of the document (for reasons already evoked). The tricky part is that we check the public option. If it is set to true, anybody will be able to access this page. Otherwise we call our authentication middleware to ensure that only an authenticated user can access it.
// Get show dataset page
router.get("/:index", function(req, res) {
    var index = req.params.index;

    // Find dataset by index
    Dataset.findOne({index: index}, function(err, dataset) {
        if (err) {
            req.session.error = "Error retrieving the dataset";
            res.redirect("/index");
        } else {
            // Only send non-sensible info to res (ie: striped from API keys)
            var cleanDataset = {name : dataset.name,
                                created_at: dataset.created_at,
                                last_entry_at: dataset.last_entry_at,
                                entries_number: dataset.entries_number,
                                data: dataset.data}

            // Check if the dataset is public or not
            // If it is, no need for auth middleware. If not, check auth
            if (!dataset.public) {
                helper.authenticate(req, res, function() {
                    res.render("datasets/show", {dataset: cleanDataset})
                });
            } else {
                res.render("datasets/show", {dataset: cleanDataset});
            }
        }
    });
});
Finally import and register the new route in app.js:
//  Loading routes
...
    datasets = require("./routes/datasets");
...
// Register routes
...
app.use("/datasets", datasets);
Corresponding code
Index
You should have got the hang of it by now, but let’s repeat it one more time. Start by including the required models and our helper:
var express = require("express"),
    router = express.Router(),
    helper = require("../utils"),
    mongoose = require("mongoose"),
    User = mongoose.model("User"),
    Dataset = mongoose.model("Dataset");
Requests controllers
The first thing our user needs to be able to do is to POST a setup request in order to create his account. This request will redirect him to the index page where he will be able to create his first dataset.
// POST setup request
router.post("/setup", function(req, res) {
    // Get values from POST request
    var username = req.body.username;
    var password = req.body.password;

    // Create new user document
    User.create({
        name: username,
        password: password
    }, function(err, user) {
        if (err) {
            console.log("Error creating the user: " + err);
            req.session.error = "An error occured creating the user.";
            req.location("setup");
            req.redirect("/setup");
        } else {
            console.log("POST creating new user: " + user);
            // Generate new session holding newly created user's info
            req.session.regenerate(function() {
                req.session.user = user;
                res.redirect("/index");
            });
        }
    })
});
If he comes back, he’ll probably want to login. In order to do that, we will find the user registered under the login he provided and compare the password he entered with the one from the user retrieved thanks to the helper we created earlier. If no user is found under this username or if the passwords don’t match, we redirect him on the login page with an appropriate message. Otherwise we store his informations in the current session and redirect him to his dashboard.
// POST login request
router.post("/login", function(req, res) {
    // Get values form POST request
    var username = req.body.username;
    var password = req.body.password;

    // Find user document by username
    // If a user is returned but the passwords do not match, send error message indicating wrong password
    // If no user is returned, send error message indicating wrong username
    User.findOne({name:username}, function(err, user) {
            if (err) {
                console.log("Error retrieving user " + err);
                req.session.error = "A problem occured while retrieving the user";
                req.redirect("/")
            } else if (user) {
                // Use the method registered on the User model to compare entered password with user password
                user.comparePassword(password, function(err, isMatch) {
                    if (err) throw err;

                    if (isMatch) {
                        req.session.regenerate(function() {
                            req.session.user = user;
                            req.session.success = "Authenticated as " + user.name;
                            res.redirect("/index");
                        });
                    } else {
                        req.session.error = "Authentication failed, please check your password.";
                        res.redirect("/");
                    }
                });
            } else {
                req.session.error = "Authentication failed, please check your username.";
                res.redirect("/");
            };
    });
});
Finally in case of logout we create a new session and redirect to the login page, serving the messages in the process if need be:
// GET logout request
router.get("/logout", helper.authenticate, function(req, res) {
    var errorMessage = req.session.error;
    var successMessage = req.session.success;

    // Regenerate new session; session.detroy() is not used as we still want
    // the error/success messages to be served to the endpoint
    req.session.regenerate(function() {
        req.session.error = errorMessage;
        req.session.success = successMessage;
        res.redirect("/");
    });
});
Views controllers
The first view to take care of is the landing page. What happens there ? We first check if a user has been registered. If it hasn’t, it means that our visitor needs to complete the setup process (we thus render the setup view). If a user is present in the database but not in the current session, he needs to login. Otherwise he can be redirected to the index.
// GET landing page
router.get("/", function(req, res, next) {
    var errorMessage = req.session.error;
    var successMessage = req.session.success;

    // since messages have been served, delete from session
    delete req.session.error;
    delete req.session.success;

    User.count({}, function(err, count){
        // If a user is already registered, redirect to index
        // else render setup view in order to register
        if (count) {
            if (req.session.user) {
                res.redirect("/index");
            } else {
                res.render("login", {errorMessage: errorMessage,
                                    successMessage: successMessage});
            }
        } else {
            res.render("setup");
        }
    });

});
The controller for the setup page simply serves messages if need be and renders the setup view.
// GET setup page
router.get("/setup", function(req, res) {
    var errorMessage = req.session.error;
    var successMessage = req.session.success;

    // since messages have been served, delete from session
    delete req.session.error;
    delete req.session.success;

    res.render("setup", {errorMessage: errorMessage,
                        successMessage: successMessage});
});
For the index (or dashboard, or watchamacallit), we retrieve every dataset owned by the user and pass them to the index view, along with the messages in the session:
// GET index page
router.get("/index", helper.authenticate, function(req, res, next) {
    var sessionUser = req.session.user.name;
    var errorMessage = req.session.error;
    var successMessage = req.session.success;

    // since messages have been served, delete from session
    delete req.session.error;
    delete req.session.success;

    // Find datasets documents owned by the current session user
    Dataset.find({owner_name: sessionUser}, function(err, datasets) {
        if (err) {
            console.log("Error retrieving datasets: " + err);
            errorMessage = "A problem occured retrieving the datasets";
            res.render("index", {datasets: {},
                                errorMessage: errorMessage});
        } else {
            res.render("index", {datasets: datasets,
                                errorMessage: errorMessage,
                                successMessage: successMessage});
        }
    });
});
As for the settings view, we pass it the current user in session, along with the mes…you got it by now right ?
// GET settings page
router.get("/settings", helper.authenticate, function(req, res) {
    var errorMessage = req.session.error;
    var successMessage = req.session.success;

    // since messages have been served, delete from session
    delete req.session.error;
    delete req.session.success;

    res.render("settings", {user:req.session.user,
                            errorMessage: errorMessage,
                            successMessage: successMessage});
});
Corresponding code
And that’s it for the controllers! If you’re still reading, I’m sending you a warm virtual tap on the shoulder. We’re almost there!
The views
We will rely on the jade templating engine to create our views. You are of course free to use anything else, but I personally find it convenient. The first thing you need to do is to add our front-end dependencies : bootstrap with the glyphicons fonts, jQuery, Chart.js to handle our plots, a logo and a favicon. You can also delete everything in style.css. Since we now have a favicon, we can uncomment and modify the following line in app.js:
app.use(favicon(path.join(__dirname, "public/images/favicon.ico")));
Corresponding code
Landing page
Let’s put the common elements between the setup and login page in a new landing.jade file that you will create in the views folder:
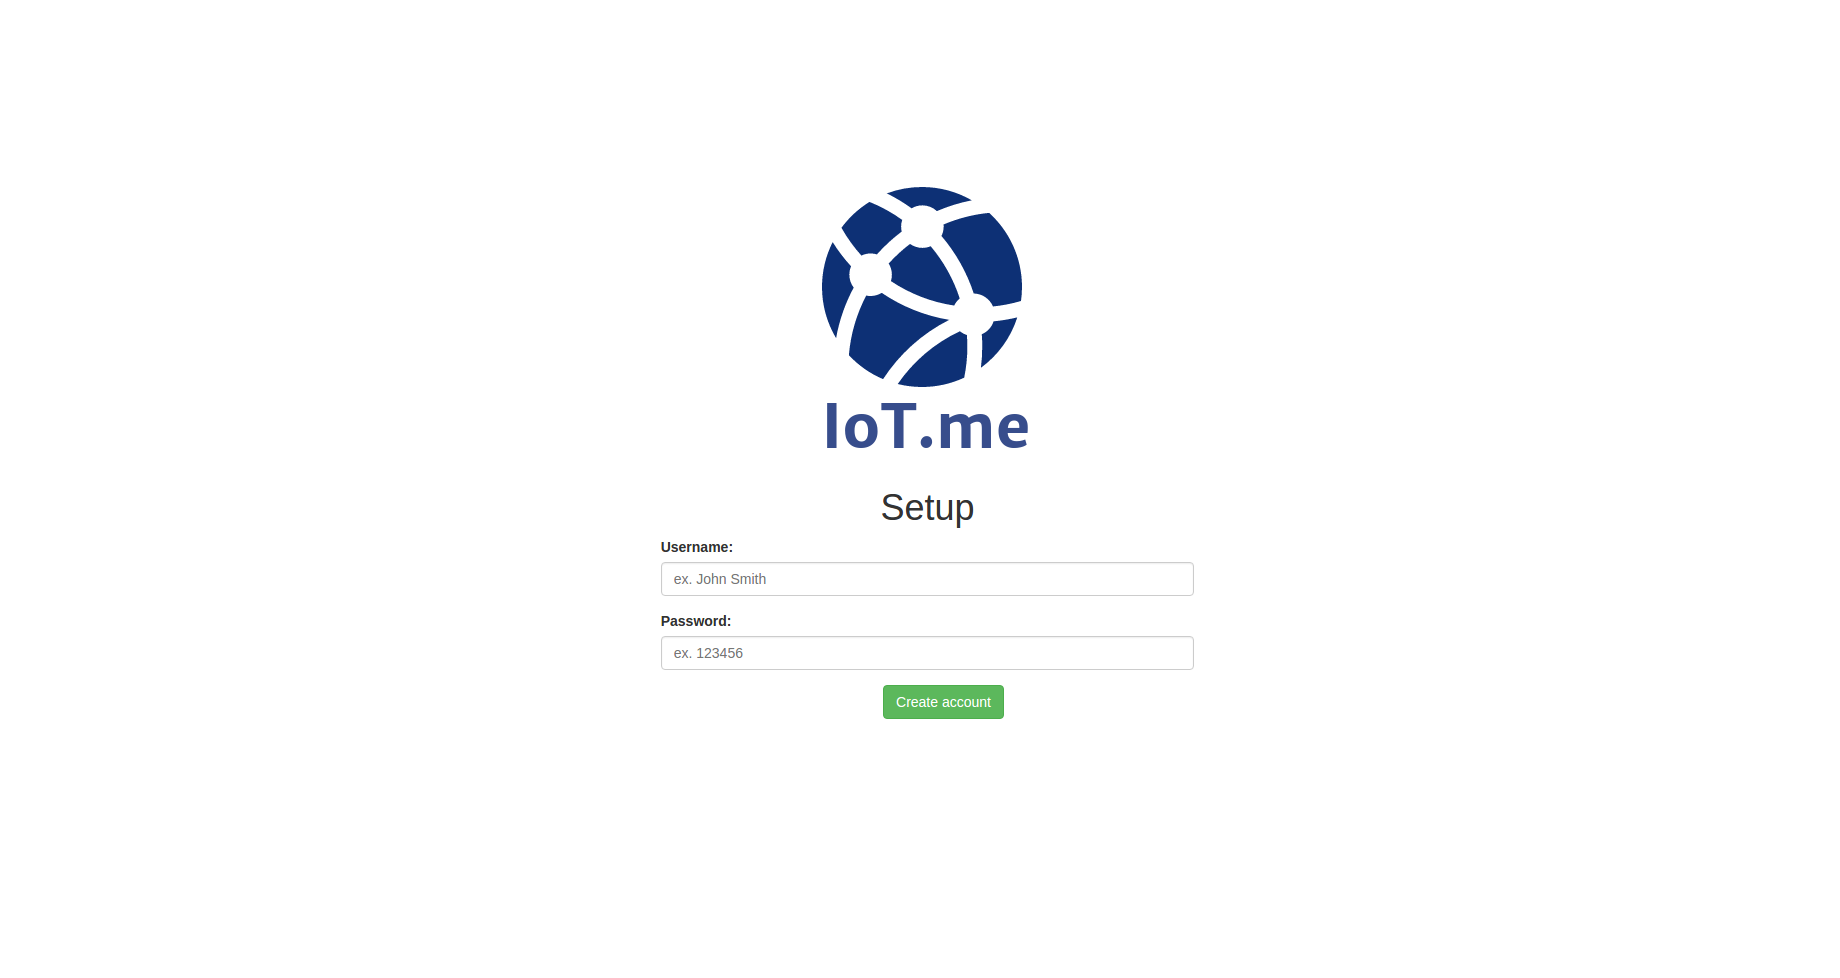
The first page on which the user will arrive is the setup page, composed of a logo and a form allowing to open a new account. Create a new file called setup.jade composed of:
extends ./landing

block content
    div.col-md-12
        h1.text-center Setup
        form#formSetup(name="setup",method="post",action="/setup")
            div.form-group
                label(for="inputUsername") Username:
                input#inputUsername.form-control(type="text", placeholder="ex. John Smith", name="username")
            div.form-group
                label(for="inputPassword") Password:
                input#inputPassword.form-control(type="password", placeholder="ex. 123456", name="password")
            div.col-md-offset-5
                button#btnSubmit.btn.btn-success(type="submit") Create account
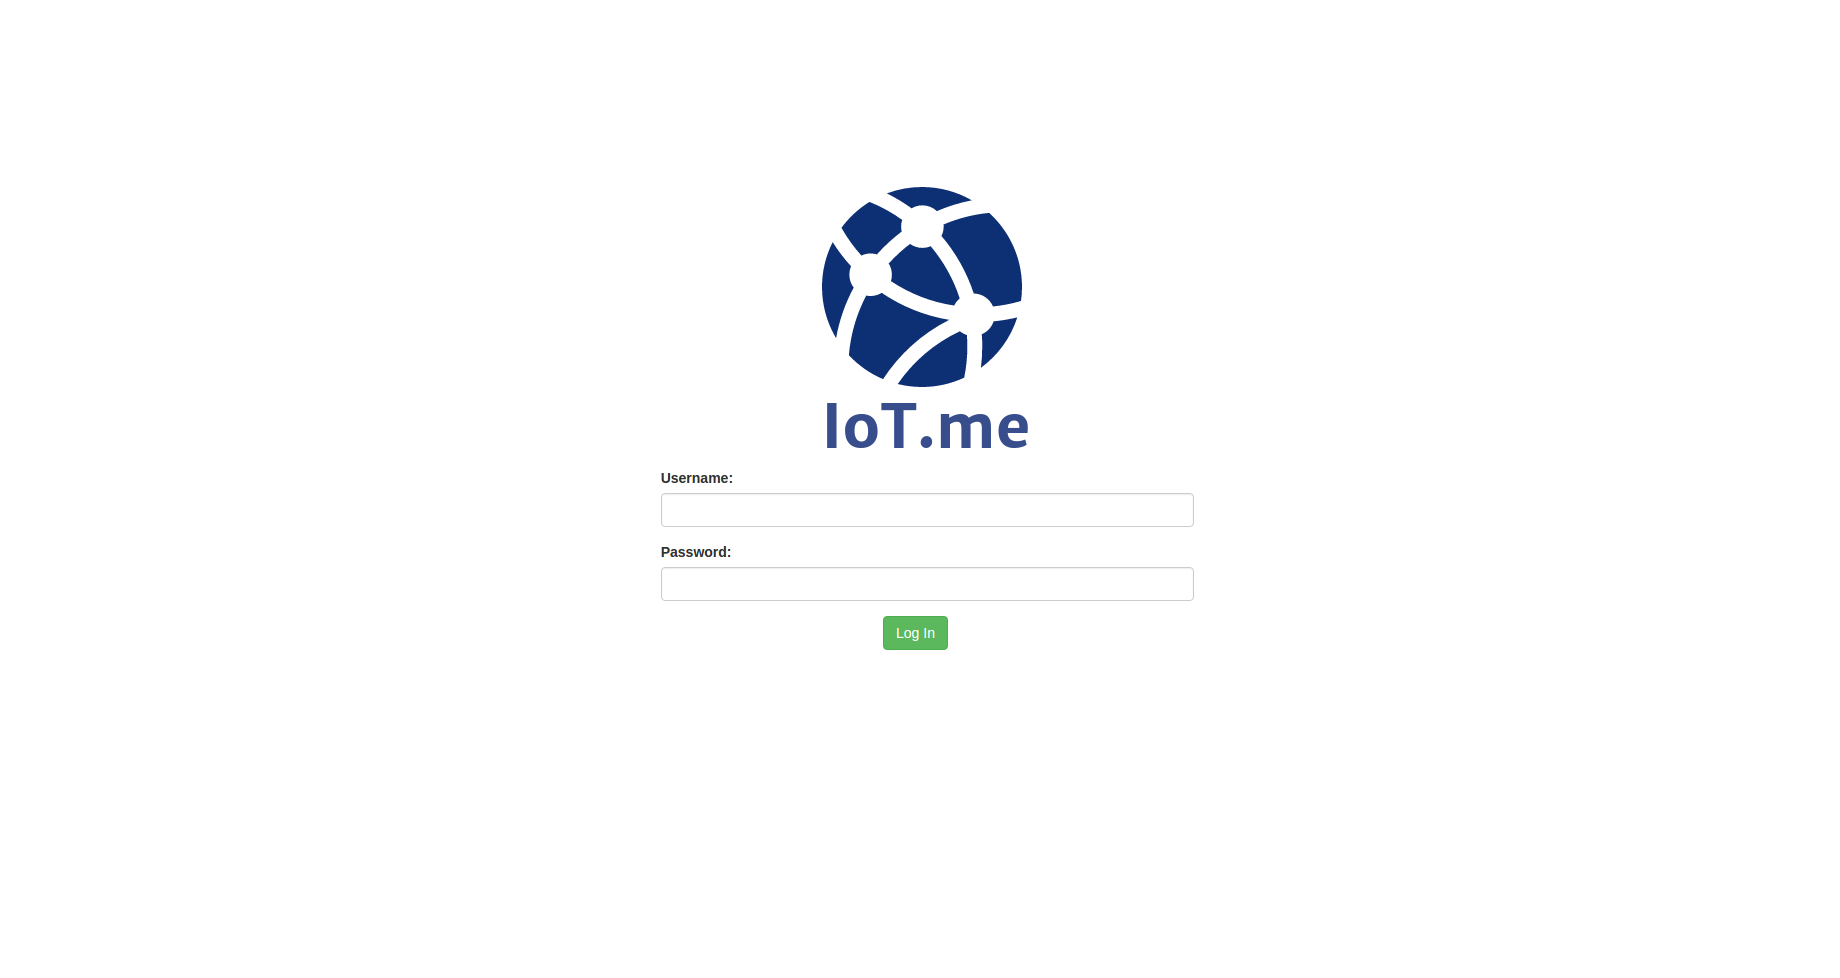
If a user is already registered, he will arrive on the rather similar (if not almost identical) login page. The key difference is that the route called by the form request is not the same. Once again, create a file called login.jade with the following content:
extends ./landing

block content
    div.col-md-12
        form#formLogin(method="POST", action="/login")
            div.form-group
                label(for="username") Username:
                input#inputUsername.form-control(type="text", name="username")
            div.form-group
                label(for="password") Password:
                input#inputPassword.form-control(type="password", name="password")
            div.col-md-offset-5
                input.btn.btn-success(type="submit", value="Log In")
Corresponding code
General views


We need to take care of the layout that will be used as the base of every views that follows. It will include a navbar and import the scripts shared by the views.
doctype html
html
  head
    title= title
    link(rel="stylesheet", href="/stylesheets/bootstrap.min.css")
    link(rel="stylesheet", href="/stylesheets/style.css")
  body
    nav.navbar.navbar-default
        .container-fluid
            .navbar-header
                a.navbar-brand(href="/")
                     img(alt="Brand" src="/images/logo.png" width="35px", height="35px")
            div
                ul.nav.navbar-nav
                    li.active
                        a(href="/index") Home
                    li
                        a(href="/settings") Settings
                    li
                        a(href="/logout") Logout
    div.row
        if errorMessage
            div.alert.alert-danger(role="alert")
                button.close(type="button", data-dismiss="alert", aria-label="Close")
                    span(aria-hidden="true") ×
                | #{errorMessage}
        if successMessage
            div.alert.alert-success(role="alert")
                button.close(type="button", data-dismiss="alert", aria-label="Close")
                    span(aria-hidden="true") ×
                | #{successMessage}
        block content

    block importScripts
        script(src="/javascripts/jquery.min.js")
        script(src="/javascripts/bootstrap.min.js")

    block inPageScript
The index will be composed of a table presenting an overview of the existing datasets, as well as an option to create new ones:
extends layout

block content
    div
        a.btn.btn-success(href="/datasets/new" role="button") New dataset
    div.table-responsive
        h3 My datasets
        table.table.table-hover.table-bordered
            thead
                tr
                    th Name
                    th API keys
                    th Created at
                    th Last data received
                    th Entries
                    th
            tbody
                - each dataset, i in datasets
                    tr
                        td
                            h4= dataset.name
                        td
                            div.col-md-6
                                strong Read:
                                | #{dataset.read_key}
                            div.col-md-6
                                strong Write:
                                | #{dataset.write_key}
                        td
                            p= dataset.created_at
                        td
                            p= dataset.last_entry_at
                        td
                            p= dataset.entries_number
                        td
                            div
                                a.btn.btn-link(href="/datasets/#{dataset.index}") Show
                            div
                                a.btn.btn-link(href="/datasets/#{dataset.index}/edit") Edit
                            div
                                form(action="/datasets/#{dataset._id}",method="POST")
                                    input(type="hidden",value="DELETE",name="_method")
                                    button.btn.btn-link(type="submit").
                                        Delete
The settings view requires a new settings.jade file. It is simply a form allowing to update account’s information:
Corresponding code
Dataset views
Start by creating a new subfolder datasets in the views.
The new.jade view (a new file that you just created without having to be asked to because you are so ahead of things) is yet again composed of a form. We use jQuery in order to dynamically add or remove variable fields.
edit.jade is extremely similar, except for the fact that we display display the variables already registered and provide a way to regenerate the dataset’s API keys.
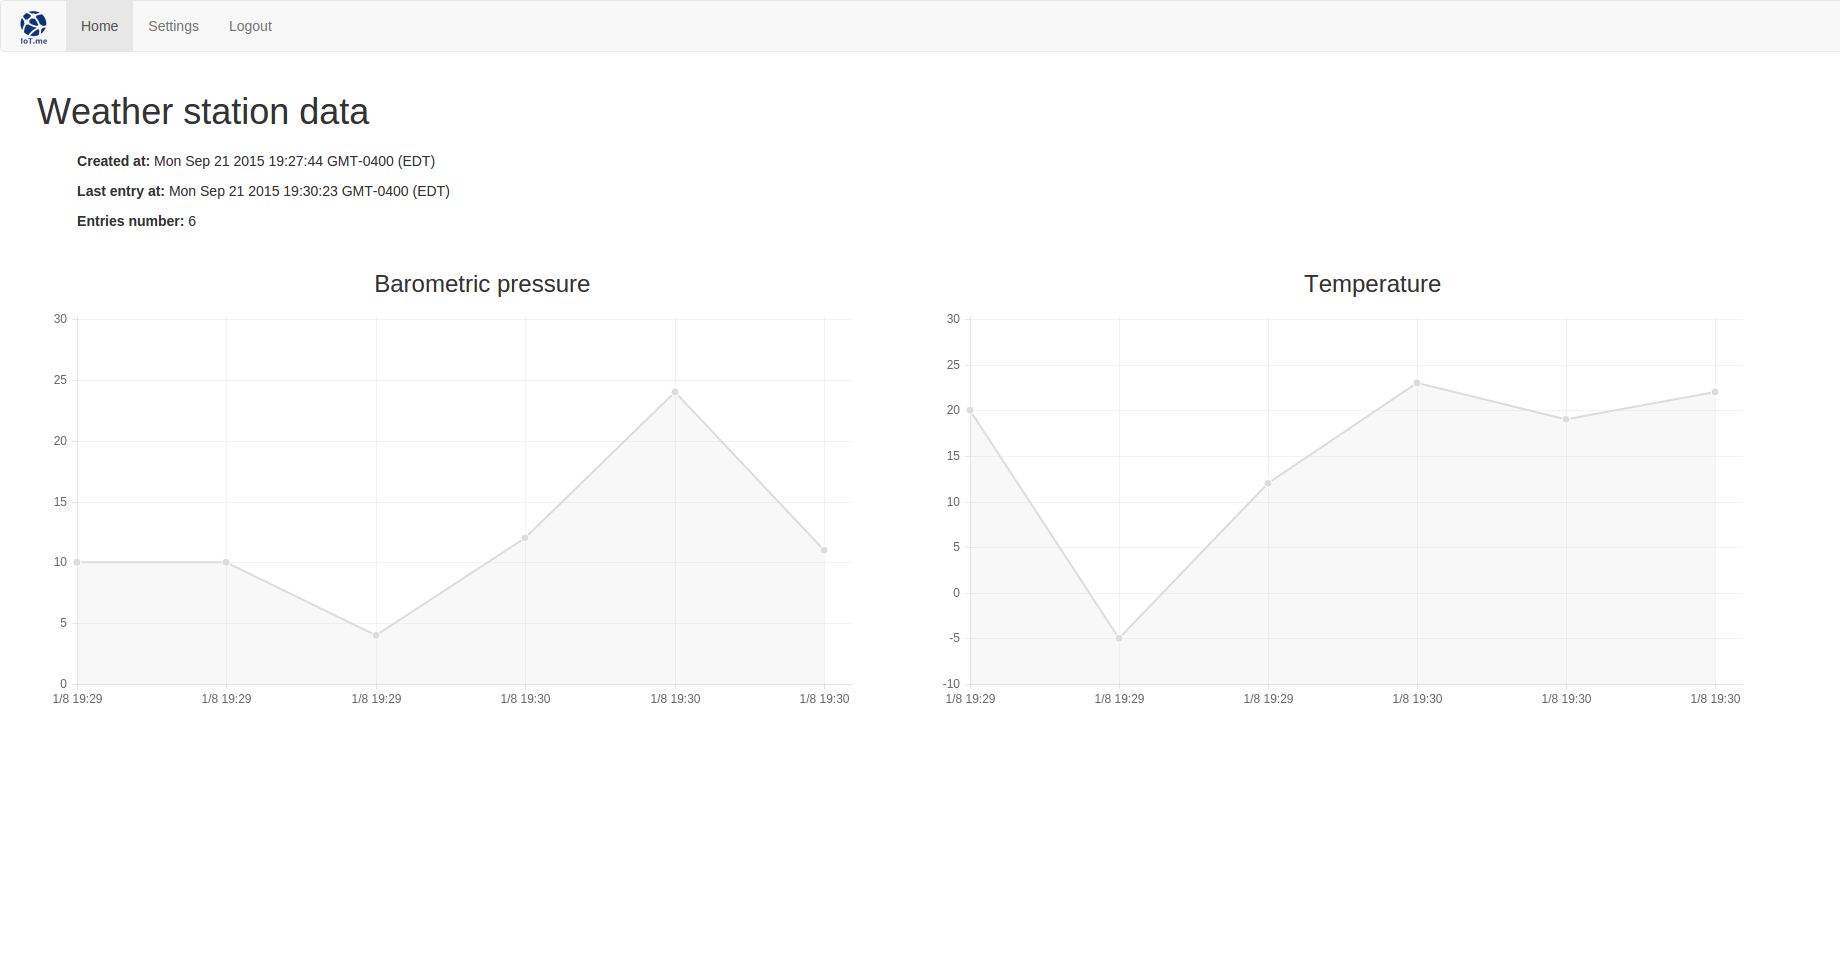
As for show.jade, it relies on Chart.js to generate a line chart for each variable. If you’re looking for more elaborate options, have a look at the D3.js and C3.js libraries. I chose Chart.js because it is very easy to implement and it gives fairly good looking results.
extends ../layout

block content
    h1=dataset.name
    ul.list-unstyled
        li
            p
                strong Created at:
                |  #{dataset.created_at}
            p
                strong Last entry at:
                |  #{dataset.last_entry_at}
            p
                strong Entries number:
                |  #{dataset.entries_number}

    if dataset.data
        - each variable, i in dataset.data
            div.col-md-6
                if variable.name
                    h3.text-center #{variable.name}
                else
                    h3.text-center #{i}
                canvas(id="#{i}_canvas", height="400px", width="800px")

    script(type="text/javascript", src="/javascripts/Chart.min.js")
    script.
        // Unserialize dataset object so that we can interract with it from the script
        var datasetObject =!{JSON.stringify(dataset)}
        var data = datasetObject.data

        // For each variable in the dataset, extract title, tag name and values
        // then instanciate the chart with theses values
        for (var property in data) {
            if (data.hasOwnProperty(property)) {
                var varTag = property;
                var varData = data[property];
                var label = varData.name;
                var xLabels = [];
                var yValues = [];

                for (var i in varData.values) {
                    // extract values
                    yValues.push(varData.values[i][0]);
                    // extract timestamp in a Date object and format the output in a string
                    var t = new Date(varData.values[i][1]);
                    var cleanTime = t.getDay() +"/"+ t.getMonth() + " " + t.getHours() + ":" + t.getMinutes()
                    // add formated timestamp to the array holding values for x axis
                    xLabels.push(cleanTime)
                }
            }

            var chartData = {
            labels: xLabels,
            datasets: [
                {
                    label: label,
                    fillColor: "rgba(220,220,220,0.2)",
                    strokeColor: "rgba(220,220,220,1)",
                    pointColor: "rgba(220,220,220,1)",
                    pointStrokeColor: "#fff",
                    pointHighlightFill: "#fff",
                    pointHighlightStroke: "rgba(220,220,220,1)",
                    data: yValues
                }
            ]
            }

            var ctx = document.getElementById(varTag+"_canvas").getContext("2d");

            new Chart(ctx).Line(chartData, {
                bezierCurve: false
            });
        }
Corresponding code.
And there you go! Your very own data platform is up and running. You can congratulate yourself, it was not such an easy project to build. And there is still much to be done. You can customize the front-end to match your preferences, add layout options to your plots, open your app to multiple users (setting a password to the database would probably be a good idea too 😉 ).
I would be very pleased to see what you will make out of it, so don’t hesitate to drop me a line in the comments!
Sources
- Server dependencies :
- Setting-up node.js on linux.
- Setting-up mongodb on ubuntu.
- Solving mongodb permissions problems on the /data/db directory.
- Using the MEAN stack (minus the A) :
- Complete express.js mongodb crud skeleton.
- Build a restful api using node and express.
- Nested objects in mongoose.
- Security and authentication :
- Authenticate user with mongoose and express.js.
- Simple authentication in nodejs.
- Password authentication with mongoose.
- Miscellaneous :
- Free logo generator.
Another great article 😉
This is s topic I resurrect from time to time in my mind.
The first cloud platform (for sensor/data) storage that I used is (now) Xively, former Cosm, former Pachube back in 2011.
I also use some other platforms including Node-Red in the last year, but your solution seems to be in the right direction for someone who wants to own their data, manage the upload frequency and regain all the freedom that seems to be much farther away each day regarding our data (whatever it is).
I now just a little abou Node.JS and MongoDB and nothing about Express.JS, but I am confident that with your article I will learn a lot and get to own my data back.
Thanks for sharing 😉
Thanks for the kind words. Don’t hesitate to contact me if you have any questions (a comment would be the best as it could be beneficial to others).
Great project! But there won’t be problem with MongoDB 16MB maximum document size? http://docs.mongodb.org/manual/reference/limits/
See, I didn’t even knew there was a limit on the size of the documents.
I ran some back of envelope calculations. Let’s take a dataset named ‘My dataset’ with 5 variables each named ‘Variable A’, ‘Variable B’ etc. With the following parameters, the approximated formula for the weight of the document W with V the number of variables and x the total number of data points is :
W = 32*V +26*V + 26*x + 250
32*V is the cost of storing the name of the variable (in bytes)
26*V is the cost of creating the ‘data’ subdocument (in bytes)
26*x is the cost of pushing an integer to the ‘data’ array (in bytes)
250 is the general overhead related to the dataset in itself (api keys, name etc.)(in bytes).
So, with 5 variables this gives us :
W = 58V + 26x + 250 = 26x + 540
if max(W) = 16Mb = 16 000 000
16 000 000 – 540 = 26x
15999460/26 = x
x = 615364
It’s an approximation but it gives a good idea. About 600k data points can be stored with the maximum document size. It’s not enough for intensive applications but it should cover the needs of most hobbyists.
Nevertheless I’ll work on a solution in order to circumvent this problem, thanks again for mentioning it!
Thank you for you calculation. For hobbyist it will be enough, but in this case it needs an old data remove process, because if you reach the limit you will get error message and you can’t save the new values. But you don’t know how many variables will be in a channel. So it’s not easy.
I think, you should store data of channels in a separate collection and only place an ObjectID to link to the channel collection.
That’s a perfectly valid solution. With a new collection containing 1 document per variable it would allow 600k data points / variable to be stored. The capacity could probably be a little less than doubled by splitting the [value, datastamp] pair into two collections as well.
I’ll implement a fix shortly!
Hi, Thanks for the tutorial. I tried to run your GitHub package after npm install and node app.js. I am getting the error below:
IoT.me/node_modules/mongoose/node_modules/mongodb/lib/server.js:242
process.nextTick(function() { throw err; })
Hi,
Googling your error code, I found several references to similar situations.
https://github.com/Automattic/mongoose/issues/2861
http://stackoverflow.com/questions/29857572/mongodb-cryptic-error-process-nexttickfunction-throw-err-error-at-obj
https://www.reddit.com/r/learnprogramming/comments/4c46ro/expressjs_mongooseconnect_crashes_app/
According to these discussions, it seems to me that you are experiencing one of these situations:
1 – you are not providing the right address to mongoose for it to connect to your mongodb instance (so wrong url or ip) or your mongodb instance is protected and you don’t provide the password.
2 – Mongodb is not running because it wasn’t started (in that case type “mongod” in the shell to start it, or “mongodb” to see if you can have access to the db shell at least).
3 – Mongodb is not running because it’s having some issue (sometimes the log file is not found or the data folder provided in the path was not created stuff like that).
Anyway, have a look at the links and let me know if it helps!
Hi, Thanks. Yes, I did not have my MongoDb started. Are you planning to use the site with Particle IoT devices?
I had it set-up with a simple weather station I made based on the ESP-8266 but it would work very well with the Photon (I’ve been playing with the Electron lately too – GSM enabled microcontroller which comes with its own battery and a bunch of IOs). I’ve used some of this code as a base for other applications, one of which involved a Photon and I had to modify the payload system a bit to work with web hooks events: when some data is ready to be sent, I use
Particle.publish()to publish an event. I have a callback registered on the cloud (I don’t know if you are familiar with their cloud system or not but if not it’s all in their doc) which looks like that:{
“eventName”: “some_event_name”,
“url”: “http://52.xx.xxx.xxx:3000/payload”,
“requestType”: “POST”,
“json”: {
“event”: “{{SPARK_EVENT_NAME}}”,
“published_at”: “{{SPARK_PUBLISHED_AT}}”,
“coreid”: “{{SPARK_CORE_ID}}”,
“category”: 0
},
“mydevices”: true
}
so when an event called some_event_name is published by my photon it triggers this which in turn makes a POST request from the cloud to my server.
Do you already have an application in mind?
hi, yes. I just want to log temperature and events with a Photon. I am assuming you are using ParticleJS SDK and HTTP/SClient library to post data to /update?api_keys from the device.
I’d like to use mysql mainly because I am not too familiar with MongoDb and its document size limitations you mentioned.
Thanks. I just saw your details reply below about Particle.publish and web hooks. I like Particle because of their simple programing tools but I don’t want to rely on them too much with the device events and my data.
yeah I get that. In that case you’re right using an http library would be the way to go.
what a great project 🙂 how do you make it so there can be more users ? cant seem to find it anywhere, and the code for ESP is the same you would use for thingspeak ?
Found out about the users, tried from another computer and i could create another user, 🙂
So here is another problem, when i try to send something to the server, it responds like this
New entry for dataset with API key: 6aaf688d4480470efba4eeffa8bb2c8a
_http_server.js:192
throw new RangeError(`Invalid status code: ${statusCode}`);
^
RangeError: Invalid status code: 1
at ServerResponse.writeHead (_http_server.js:192:11)
at ServerResponse.writeHead (/root/IoT.me/node_modules/on-headers/index.js:55:19)
at ServerResponse.writeHead (/root/IoT.me/node_modules/on-headers/index.js:55:19)
at ServerResponse._implicitHeader (_http_server.js:157:8)
at ServerResponse.OutgoingMessage.write (_http_outgoing.js:446:10)
at writetop (/root/IoT.me/node_modules/express-session/index.js:290:26)
at ServerResponse.end (/root/IoT.me/node_modules/express-session/index.js:338:16)
at ServerResponse.send (/root/IoT.me/node_modules/express/lib/response.js:204:10)
at ServerResponse.sendStatus (/root/IoT.me/node_modules/express/lib/response.js:341:15)
at /root/IoT.me/routes/datasets.js:40:25
at Query.callback (/root/IoT.me/node_modules/mongoose/lib/query.js:2129:9)
at /root/IoT.me/node_modules/kareem/index.js:259:21
at /root/IoT.me/node_modules/kareem/index.js:127:16
at _combinedTickCallback (internal/process/next_tick.js:67:7)
at process._tickCallback (internal/process/next_tick.js:98:9)
[nodemon] app crashed – waiting for file changes before starting…
Hi Alexis,
As a node numbie trying to catch my arduino data into a DB and view it through a browser, I really appreciate this tutorial/application! It appears you slowed down on development about a year ago, but if you have a few minutes, there are a couple of tweaks that would improve this tutorial for others:
(1) More incremental testing and verification that each coding step would help cement the functionality and structure as well as validate that there aren’t any editing mistakes,
(2) more explicit target filenames … half the time I had to go to your github resource to figure out which file I was creating/editing,
(3) when I got to the end, I had made many mistakes – rather that go through it all again, I cloned your repository. To get it working, I had to run “npm install” – duh, but when you’re brain-dead at the end of the day after implementing this tutorial, a little hand-holding goes a long way :-).
“Create User” is not working so I will have to go back and figure out why but I am sure there is a step I missed when I cloned the repository and it will work once I do.
Last thing – at the top of app.js, you have a semicolon at the end of the first line. I’m not sure why it seems to work but I thought, as a list of variables, it should be a comma like the following lines.
Thanks!
Dave
Create user is working – I just had the metaphor wrong. I thought the new user clicked on it before entering the username and password.
Hello David,
I am glad that you found your tutorial helpful and greatly appreciate your comment and suggestions as I am always trying to improve on my pedagogy.
Unfortunately I won’t be able to make any modification for the time being. I pivited my activities from programming and engineering to cycling around the world which doesn’t leave me much time to take care of the blog (@wherethefuckisalexis on instagram if you’re into that sort of things).
That being said, I wish you best of luck in your arduino endeavours. I hope that it will bring you as much enjoyment as it did for me.
Wow! Are you keeping an online journal?!?!?!
Hello David,
Thank you for your comment and suggestions. I am always trying to improve on my pedagogy and am still learning myself how to disseminate my knowledge in the most clear and accessible way.
That being said I won’t be able to update the blog for the time being as I am currently engaged in a bicycle tour around the world that might keep me busy for a year or two (@wherethefuckisalexis on instagram if you are into that sort of things).
Best of luck in your arduino endeavours, I hope it will bring your as much enjoyment as it did for me.
I am trying to use Mqtt.fx to connect to IoT.me to simulate sending data but I apparently do not have the correct parameters in Mqtt.fx to connect to IoT.me. Has anyone had success with this approach?Thanks in advance for any assistance.
Hello Alexis,
Thank you for sharing your ideas on how to create our own data platform for IoT. I have been looking for tutorial in google and the only tutorial I found was yours. 🙂
I would like to ask for your permission if it is okay for me to use your IoT platform project for my school project? I will try my best to improve this and of course I will share it here after I finish it.
Hoping for your kind consideration and understanding.
Thank you and God bless!
Hello Alexander,
You are very welcome to use the code however you please. I am glad that I can be useful!
I wish I could tweak it a little to add some improvements as well but I am in the middle of China currently so I’m afraid I won’t have the chance. For one thing I should have used promises instead of callbacks. Adding functional tests as well wouldn’t hurt.
Anyhow. Best of luck with your project! Looking forward to seeing the result.
Hello Alexis,
Great tutorial.
I hope you doing well on your China tour…
Just one simply ask : Do you planing to have some finished version for sale ?
I like to have my own IoT database/site
Best regards.
Thank you for the kind words.
I’m actually in Japan now and yes it is going very well.
As for a professional version of the app proposed in this tutorial, I have used it as a base (with a lot of modifications to make use of the new javascript standards) for several projects on which I have worked on for clients but I am unfortunately not available for any medium/long-term contract at the moment due to the journey I am involved in.
can you please help me to create smaller project???
Hi Alexis ,
I have been struggling please help me.
Case 1-How can i add data through postman to check it?
I have tried http://localhost:3002/datasets/update?key=4c0f98819761fd6b31e7b128de53f64d&var1=11 but its not working.
Case2- How can a device make a request to write the data eg, Temperature and Humidity for a specific user?